 makes one 9½” tart
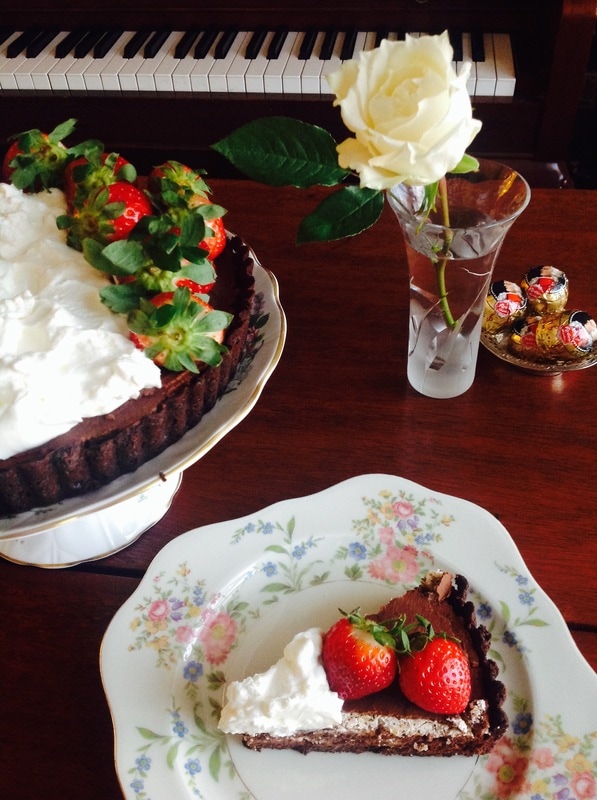
Chocolate Tart Dough (You will need a 9½” x 1” tart pan with removable bottom) 1¼ cups all-purpose flour ¼ cup Dutch process unsweetened cocoa (lightly spooned into a measuring cup) generous pinch of salt 8 tablespoons unsalted butter, cold, cut into ½” pieces ¾ cup confectioners’ sugar 1 large egg ¾ teaspoon vanilla In a small bowl, whisk together the flour, cocoa and salt. In the bowl of a food processor fitted with the blade attachment, pulse the butter and confectioners' sugar until the sugar is incorporated. Add the flour/cocoa/salt and pulse until the mixture resembles coarse meal. Add the egg and vanilla; pulse a few times just to incorporate. Transfer the dough to a piece of plastic wrap, gather it into an 8” disc. Wrap and refrigerate for an hour or overnight. Remove the dough from the refrigerator, place it between two sheets of plastic wrap and roll it into a circle, about 11” in diameter and ⅛” thick. Peel off the top sheet of plastic wrap, flip the dough over the tart pan and gently press it along the bottom and up the sides of the pan. Remove the second sheet of plastic and trim the edges evenly with the top of the tart pan. Refrigerate for at least an hour or overnight. Preheat the oven to 375 degrees F. Prick the bottom of the tart shell with a fork. Line the tart with parchment paper and beans. Place the tart shell on a baking sheet and bake on the middle rack for 15 minutes, then carefully remove the parchment paper and beans. Bake for an additional 5 minutes, just until the pastry is dry. Do not over bake or the crust will taste bitter. Remove from the oven and set on a rack to cool. For the Meringue: (inspired by Hannah Miles and Mozart-Kugeln) Prepare two baking sheets: Place one parchment sheet on each baking sheet; use a pencil to trace the outline of a circle, 8½” in diameter on each sheet. Turn the paper over so you don’t have a pencil line on the meringues. Prepare the meringue. Preheat the oven to 200 degrees F. 2 egg whites ½ teaspoon cream of tartar ½ cup granulated sugar, pulsed until fine in the food processor ⅓ cup each, finely chopped hazelnuts, almonds and pistachios (total 1 cup) ¾ teaspoon rose extract 1 drop pale pink food coloring (optional) In the bowl of a standing mixer fitted with the whisk attachment, place the egg whites and cream of tartar. Beat on medium until foamy, then gradually add the sugar, one tablespoon at a time until the meringue is thick and glossy. Remove the bowl from the mixer, add the extract and food coloring, then gently fold in the chopped nuts. Fill a piping bag with a large circular tip (not a star tip; the nuts will might get in the way) and pipe a circle of meringue on each of the parchment sheets, using your outline as a guide. Place in the preheated 200 degree F oven and bake for 1 hour and 15 minutes. Turn off the oven and let the meringues cool in the oven for another half hour. Remove from the oven and let cool completely. Mousse filling- 7 oz. bittersweet chocolate ( I used Trader Joe’s 72% dark chocolate) ⅔ cup heavy cream 2 egg whites pinch of salt pinch of cream of tartar 1 tablespoon granulated sugar Melt the chocolate in a bowl set over a pot of barely simmering water; do not let the chocolate come in contact with the water or it will seize up. When melted, remove the chocolate from the double boiler and let it cool to room temperature. In a mixing bowl, whip the cream with a handheld electric mixer until it holds soft peaks. In a clean mixing bowl, combine the egg whites with the salt and cream of tartar. Using clean beaters, whip the whites until they begin to look foamy. With the mixer on low, gradually add the sugar then increase the speed and whisk until the whites are thick and hold their shape; they should be shiny, not dry. Transfer the chocolate mixture to a large bowl. Using a rubber spatula, gently fold about ⅓ of the whipped cream into the chocolate, making sure to scrape the chocolate from the bottom of the bowl. (It is important that the chocolate is not hot, not cool, just room temperature.) Gently fold in the remaining whipped cream. Now add about ⅓ of the meringue, being careful not to deflate the mixture too much. Fold in the remaining meringue. Retrieve the baked and cooled tart shell and the baked and cooled meringue discs. To assemble the tart- (Set the tart shell on a baking sheet or serving platter; don’t forget it has a removable bottom.) Spoon one-third of the mousse over the tart shell, using an offset spatula to smooth it evenly. Place one of the meringues on top of the mousse and cover it with one-third of the mousse, spreading it evenly. Gently place the second meringue on top of the mousse and cover with the remaining mousse. Cover the tart with plastic wrap and return to the refrigerator. When ready to serve, prepare the Rose Whipped Cream. Carefully remove the outer tart ring and garnish the tart with fresh strawberries. (It is easiest to slice the tart using a knife that has been dipped in hot water.) Cover and refrigerate any leftovers. Rose Whipped Cream- makes about 1 cup ½ cup + 1 tablespoon heavy cream, chilled 1 tablespoon confectioners’ sugar 1/2 teaspoon rose extract fresh strawberries for garnish, lightly rinsed
0 Comments
Leave a Reply. |
Archives
July 2024
|
 RSS Feed