 makes one 9” pie
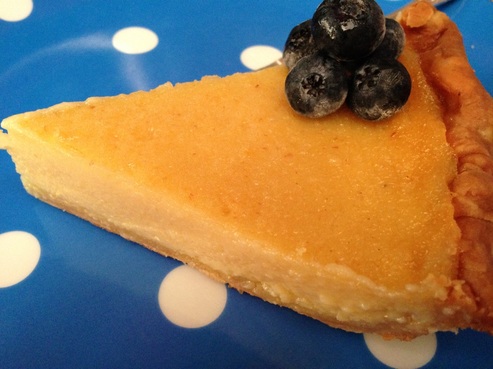
(adapted ever so slightly from Emily and Melissa Elsen) For the crust- makes one 9” single crust Preheat your oven to 425 degrees. ½ cup white whole wheat flour ¾ cup all-purpose flour ½ teaspoon salt 1½ teaspoons sugar 4 oz. (1 stick) cold, unsalted butter cut into pieces ¼ cup ice cold water combined with 1 teaspoon cider vinegar 1 egg white whisked together with 1 teaspoon of water to paint the crust In a large mixing bowl, whisk together the flours, salt and sugar. Using a pastry cutter, cut in the cold butter until the mixture resembles peas with a few large pieces of butter remaining. Add the cold water/cider vinegar and using your fingertips, gently work the mixture together until it forms a soft dough. If it feels a bit dry, you can add an additional teaspoon or two of ice cold water. Gather the dough together, shape it into a disc and wrap in plastic wrap. Refrigerate the dough for at least an hour before rolling it out. When chilled, roll the dough out on a lightly floured sheet of parchment paper into a 12” circle. Fit the dough into a 9” pie plate, folding the edges under and crimping them. Place the pie shell in the freezer for 15 minutes. Preheat your oven to 425 degrees. Place the frozen pie shell on a baking sheet, use a fork to prick the bottom and sides of the shell to prevent shrinkage/puffing up. Line with parchment paper and beans and place on the bottom rack of the oven. Bake for 20 minutes, remove parchment and beans. Brush the crust with the egg white and teaspoon of water. Bake for an additional 5 minutes on the middle rack of your oven until the crust is set and lightly golden. Set aside to cool while you prepare the filling. 3 cups fresh corn (I used 3 ears of corn; kernels cut from the cobs weighed 15 oz.) 1 tablespoon vegetable oil 1 tablespoon unsalted butter for sautéeing the corn 1 cup heavy cream 1 cup whole milk 6 tablespoons unsalted butter, melted ½ cup granulated sugar 2 tablespoons yellow cornmeal ½ teaspoon salt generous pinch of freshly grated nutmeg ½ cup good quality maple syrup (use Dark Amber or Grade B) 3 large eggs 1 egg yolk In a bowl, toss the corn kernels with the vegetable oil. Place 1 tablespoon of butter in a heavy bottomed sauté pan or preferably a large cast iron skillet . Melt the butter over medium heat and add the corn kernels. Sauté the corn, stirring it occasionally to prevent sticking, just until it softens and begins to caramelize, about 8-10 minutes. Remove from the heat. Place the corn and the heavy cream into the bowl of a food processor fitted with a blade attachment. Pulse several times until you have a coarse puree. Scrape this mixture into a large bowl, add the milk and let the mixture steep for at least half an hour. (Note: the length of time the puree steeps affects the amount of liquid absorbed and extracted. Ideally, you want to come away with a total of 1 cup of heavy cream/milk extracted from the kernels.) Set a fine mesh strainer over a large Pyrex measuring cup or a bowl and using a rubber spatula, press on the kernels, straining the liquid from the corn puree. You should end up with 1 cup of liquid; you won’t be using the reserved kernels for this recipe, but I use them to make corn chowder or as an add-in to waffle batter. (A little bacon wouldn’t hurt the chowder or the waffles, if you’re so inclined…) Preheat your oven to 325 degrees. In a large mixing bowl, combine the melted butter, sugar, cornmeal, salt, nutmeg and maple syrup. Whisk in the eggs one at a time, then whisk in the yolk. Add the strained liquid from the corn puree and whisk once or twice just to combine. Set the cooled pie shell on a baking sheet lined with parchment paper and place it on the middle rack of your oven. Carefully pour the custard filling into the pie shell and bake at 325 degrees for 40-45 minutes, rotating the baking sheet halfway through. When the pie is finished baking, the edges will set and be puffy, the center will jiggle ever so slightly. Don’t be tempted to overbake; the filling continues to set up as it cools. Place the pie on a rack to cool completely before serving. Serve as is or with summer berries. Refrigerate leftovers.
0 Comments
Leave a Reply. |
Archives
July 2024
|
 RSS Feed