 (a mash-up from the Farm Journal’s Complete Pie Cookbook and Allison Kave)
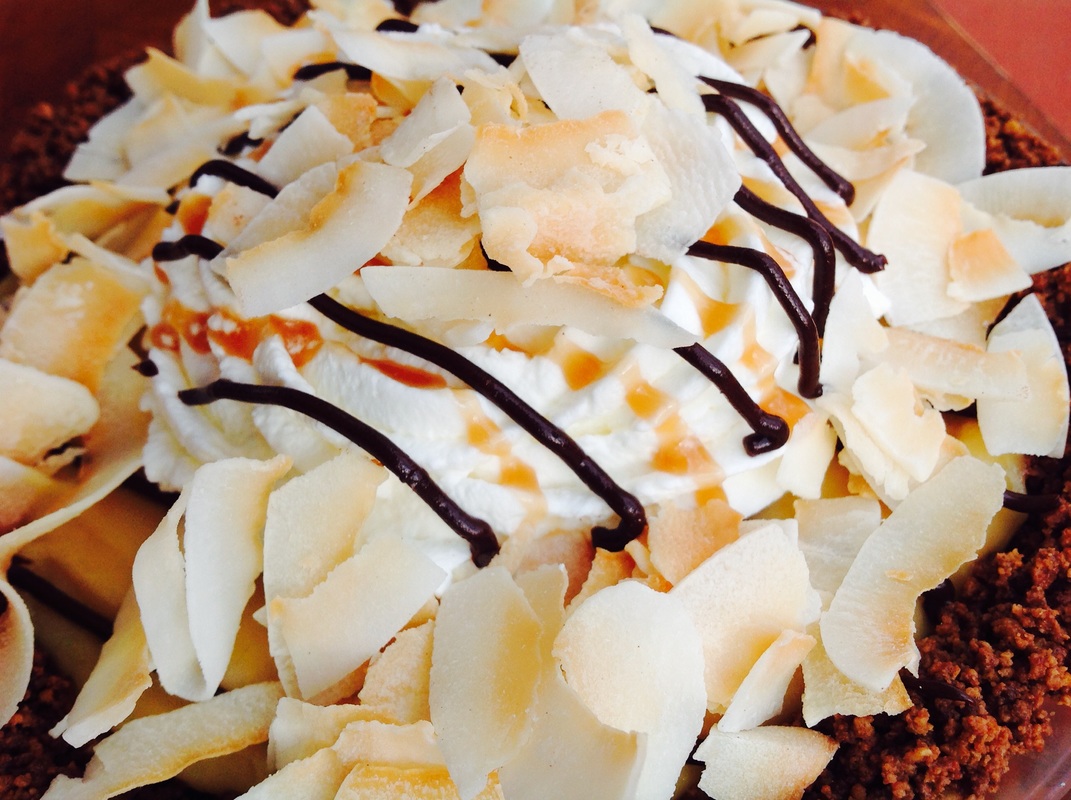
Makes one 9” pie (This pie combines the flavors found in Samoa cookies; chocolate, coconut and caramel. The sum of its parts results in a rich pie, but by using dark chocolate in the ganache and lightly sweetened whipped cream with desiccated coconut, it is less cloying than a pie made with sweetened flake coconut and semi-sweet chocolate.) Cookie crumb crust 2 cups cookie crumbs (shortbread, chocolate or vanilla wafers, graham crackers all work well) ¼ teaspoon salt 5-6 tablespoons melted butter (depends on the cookie; you’re looking for a moist mixture that you can pat into the bottom and up the sides of your pie plate) Lightly butter your pie plate; in a medium bowl, combine the cookie crumbs, salt and melted butter. Stir together with a fork. Pat the mixture into the bottom of the pie plate, then work your way up the sides. A small measuring cup (I use ¼ cup) works well to pat the crumbs evenly into place. Preheat the oven to 325 degrees and place the pie plate in the fridge to set up. Place the pie shell on a baking sheet and bake in the middle rack of the oven for 8-10 minutes until set. Place on a rack to cool while you prepare the filling. Ganache for lining the pie shell and garnishing the pie 3 oz. dark chocolate (60%)(not unsweetened) finely chopped 3 oz. heavy cream In a heavy bottomed saucepan, heat the cream until it is hot to the touch, just simmering. Remove from the heat and pour it over the chopped chocolate. Whisk together until smooth; set aside to cool. Pour a thin layer of ganache over the cooled cookie crust and spread with an offset spatula. You should have plenty of ganache left over to decorate the pie. Place the chocolate lined pie shell in the refrigerator to get cold while you prepare the filling. The ganache needs to be set and cold before you add the burnt sugar custard. Burnt sugar custard 2½ cups whole milk ⅔ cup sugar for the burnt sugar ½ cup sugar to add to the pudding ⅓ cup flour ½ teaspoon salt 3 large egg yolks, beaten together with a fork 1 teaspoon good quality vanilla 2 tablespoons unsalted butter, cut into small pieces Place the milk in a saucepan, bring to a simmer over medium heat them remove from the heat and set aside. Place ⅔ cup of sugar in a heavy bottomed saucepan. Cook over medium heat, watching it constantly, until it caramelizes; it will take about 6 or 7 minutes. The sugar will start to caramelize around the edges first- you should wear an oven mitt and carefully swirl the pan so the sugar cooks evenly. You are looking for the color of amber; when the sugar is completely melted and caramelized, slowly add the hot milk. The caramelized sugar will solidify when you add the milk- not to worry. Use a wooden spoon to gently stir the milk/caramelized sugar over medium heat. The hardened caramel will soften and combine with the milk. It takes a few minutes, be patient. Remove the pan from the heat and set aside. In a small bowl, whisk together the flour, salt and the remaining ½ cup of sugar; gradually whisk this into the egg yolks. Set the bowl with the egg yolks on a towel so it doesn’t wiggle; add a few tablespoons of the hot milk/caramel mixture to the egg yolks, whisking constantly to warm them up. Slowly add an additional 1 cup of the hot milk/caramel mixture to the eggs. Then add the egg mixture back to the hot milk/caramel and cook over medium heat, stirring constantly for about 5 minutes. The mixture should thicken and have the consistency of pudding. Let the pudding just come to a boil, cook it for an additional minute, then remove from the heat and whisk in the butter. Strain the mixture through a fine mesh strainer into a clean bowl. Press a piece of plastic wrap directly on the filling to prevent a skin from forming. Cool. Whipped cream to garnish ½ cup heavy cream 1-2 teaspoons confectioners’ sugar ¼ teaspoon good quality vanilla Whip the cream until soft peaks form, then add the confectioners’ sugar and vanilla and whip until the cream thickens. Cover and refrigerate until ready to use. Coconut Caramel (you can skip this component, but this sauce is a keeper) (You will need a can of coconut milk; I use Chaokoh brand- it doesn’t contain any added sugar; the cream forms a distinct layer from the milk when you refrigerate the can) 1 cup sugar ½ cup water ¼ teaspoon salt ½ cup coconut cream (this is the thick layer on the top of the coconut milk) 1 tablespoon butter ½ teaspoon good quality vanilla toasted desiccated coconut*, to garnish Combine the sugar and water in a medium heavy-bottomed saucepan. Bring to a simmer over medium heat, carefully swirling the pan so the sugar cooks evenly. The sugar will begin to caramelize around the edges first; you are looking for a deep amber color. Remove the pan from the heat, gradually add the coconut cream; the mixture will bubble and steam, be careful not to let it splatter on you. Whisk the mixture until the coconut cream is incorporated, then add the butter and the vanilla. Set aside to cool; place in a jar and keep refrigerated. When ready to assemble the pie, scrape the cooled burnt sugar custard into the pie shell. Garnish with the whipped cream, and drizzle the ganache and the caramel over the pie. Sprinkle toasted coconut on top. Cover and refrigerate any leftovers. * desiccated coconut is large flake, unsweetened and available at Trader Joe’s and Whole Foods
0 Comments
Leave a Reply. |
Archives
July 2024
|
 RSS Feed