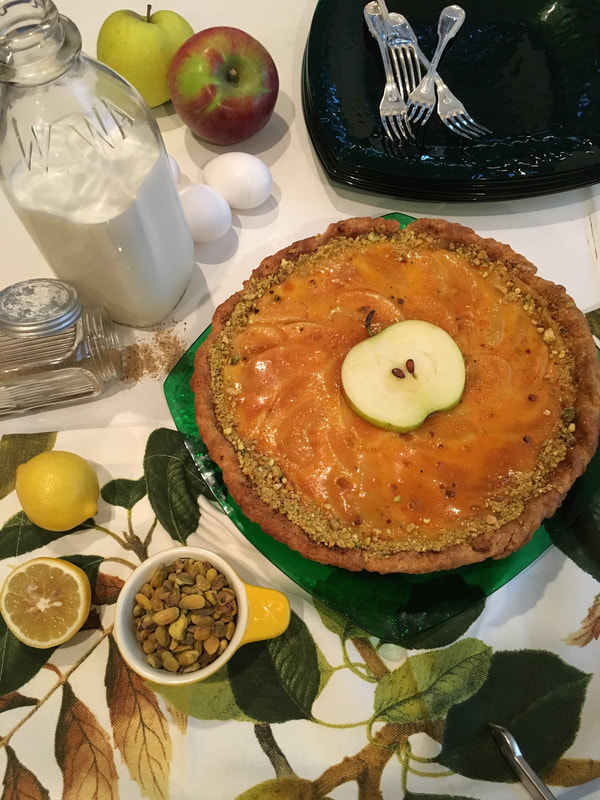
 Pistachio Tart Crust (makes enough for one 10” tart pan with removable bottom) ⅔ cup unsalted roasted pistachios ¼ cup sugar 1 cup all-purpose flour ⅛ teaspoon salt ½ teaspoon lemon zest 8 tablespoons (4 ounces) unsalted, cold butter, cut into ½” pieces 1 large egg yolk 2 tablespoons heavy cream In the bowl of a food processor fitted with the blade attachment, pulse the pistachios with the sugar until the nuts are finely ground. Add the flour, salt, and lemon zest, pulsing a few times to incorporate the flour with the sugar and nuts. Add the cold butter pieces, pulsing just until the mixture resembles coarse meal. Turn the mixture into a large bowl. In a small bowl, whisk together the egg yolk and heavy cream. Add the yolk and cream to the flour/butter mixture, tossing it together with a fork. Gather the mixture together and shape it into a disc. Wrap the dough in plastic wrap and refrigerate for at least half an hour before rolling out. On a lightly floured sheet of parchment paper, roll out the dough into a circle about 12” in diameter and about ⅛” thick. Carefully flip the parchment onto the tart pan, peeling back the parchment to release the dough. Use your fingers to smooth the dough against the bottom of the pan and evenly along the sides. The dough should extend over the edge of the tart pan. Use lightly floured fingers to create a decorative edge, standing about ½” above the tart ring. Place the tart shell in the freezer to firm up before blind baking. Preheat the oven to 375 degrees F. Place the tart shell on a baking sheet and line the tart with parchment paper and beans. Bake on the middle shelf of the oven for 15 minutes. Remove the baking sheet from the oven and carefully remove the parchment paper and beans. Prick the bottom of the tart shell with a fork. Reduce the oven temperature to 350 degrees F. Return the shell to the oven for an additional 5-8 minutes, just until the tart shell is set and the bottom is dry. Set on a rack to cool while you prepare the filling. For the filling- (There are three separate measurements for sugar; one is for the sautéed apples, one is for the custard and the last one is for caramelizing the top (optional). 3 firm textured apples, (weighing about 1¾ lbs.) washed, peeled, cored and sliced ½” thick (I used a mixture of Honeycrisp and Northern Spy apples) 1 teaspoon fresh lemon juice 2 tablespoons butter ⅓ cup sugar 1 cup heavy cream ¾ cup whole milk 3 eggs, lightly beaten ½ cup sugar 1 tablespoon cornstarch 1 teaspoon vanilla extract ½ teaspoon lemon zest ¼ teaspoon ground cardamom ⅛ teaspoon salt freshly grated nutmeg for the top of the tart ¼ cup granulated sugar, if you with to caramelize the top of the tart (see Note) Set the apple slices in a medium bowl and toss to coat with the lemon juice. In a heavy bottomed sauté pan, melt the butter. Add the sugar and the apple slices, cooking over low heat for about 7 minutes, until the apple slices become tender but not overly soft. Use a slotted spoon to remove the apple slices and place them back in the medium bowl. Reduce the juices in the sauté pan until they thicken. Add them to the apple slices; set the apple slices aside to cool down a bit while you prepare the custard. In a large bowl, whisk together the eggs, sugar, cornstarch, vanilla extract, lemon zest, cardamom, and salt. In a heavy bottomed saucepan, heat the heavy cream and milk until small bubbles appear around the sides and the liquid is warm to the touch. Gradually add a little of the heated cream and milk to the egg mixture, whisking it constantly to prevent the egg from scrambling. Continue adding the remaining cream and milk to the eggs, whisking constantly, until the custard is smooth. Transfer this mixture to a large Pyrex measuring cup with a spout. Preheat the oven to 350 degrees F. Place the cooled tart shell on a parchment lined baking sheet. Use a slotted spoon to remove the apple slices from the bowl and spread them evenly in the bottom of the tart shell. (Leave the extra juices from the apples in the bowl; they will break down the custard too much. You can reduce them and drizzle them alongside each slice of tart, if you wish.) Place the baking sheet with the tart shell on the middle rack of the oven. Pull the rack out and carefully pour the custard over the apple slices. Grate nutmeg over the top of the tart. Gently move the rack back in and bake the tart for 20 minutes. After 20 minutes, add aluminum foil strips to the edges of the tart to prevent overbrowning. Bake an additional 20 minutes until the tart has the least bit of wobble in the very center. It will continue to set up as it cools. Carefully place the baking sheet with the tart on a cooling rack. Let it cool for at least one hour before serving. (Be careful when removing the outer ring of the tart pan.) Note: This tart lends itself beautifully to a bruléed top. After removing the tart from the oven, let it cool completely. Loosely cover the tart with plastic wrap and refrigerate for an hour (or overnight.) Remove the plastic wrap. Gently dab it dry with a paper towel. Sprinkle the tart evenly with ¼ cup granulated sugar. Use a kitchen torch to brulée the top of the tart. Use a sharp knife to cut the tart; refrigerate any leftovers. 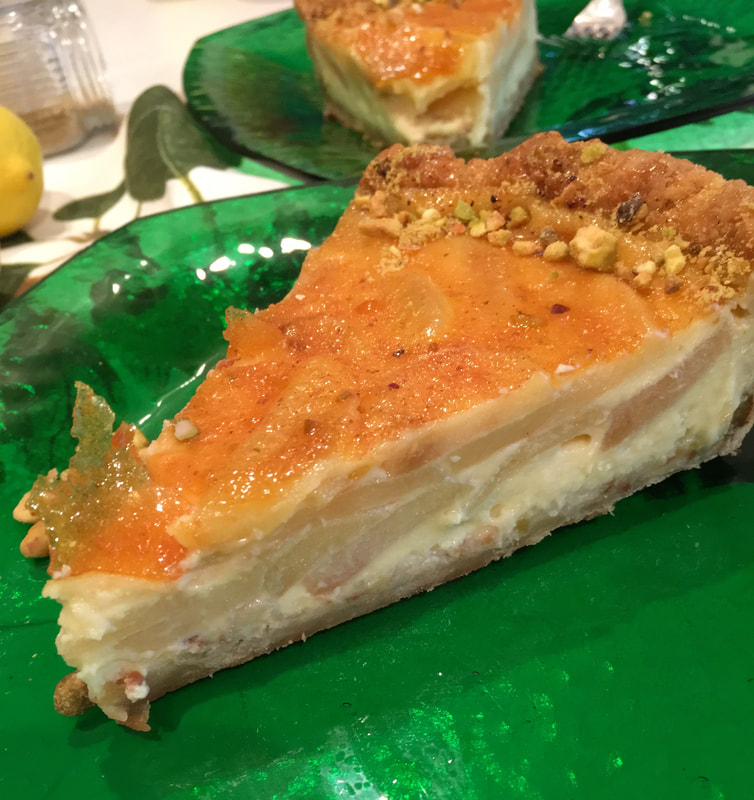
0 Comments
Leave a Reply. |
Archives
July 2024
|
 RSS Feed